Carb Theory
Carburetor Theory:
Here is a link for an article on how the CV carb system works by Mike Nixon. Mike is considered the master guru of CV carbs and has written several books on the subject. I highly recommend reading through his link.
- Here is a explanation of some of the internal circuits by LRCXed (Larry): Thanks
Created by LRCXed Larry
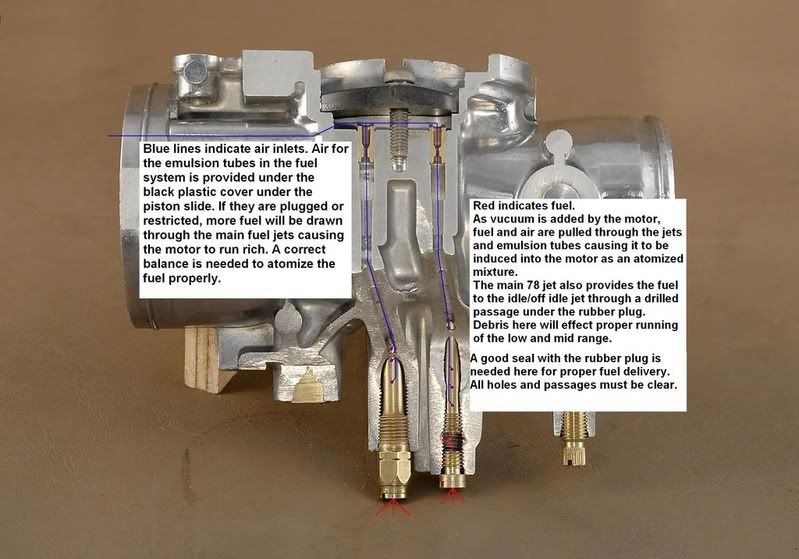
OK everyone, Here is what I have been working on with the help of Blindstitch. I think this is way overdue in the explanation on how and why the idle circuit works, as well as why they need to be cleaned out so well to work properly. I have done a cutaway for you to see how the inside of the systems work. This is just a sample of the things I'm incorporating into the book.
I hope these pictures will help folks understand why it is so important to get the insides of a carburetor so clean, and why it does not run right when it's not. This should help also in the understanding of how it works.
First up is a view of the air bleed system and the fuel pickup paths. As well as how they mix with the air to emulsify fuel for proper delivery into the motor. Please note all of the slightly small areas around the emulsion tubes where the air is passed into the center to mix with the fuel. This is a key point in proper running on the system. It's how the air/fuel mixes to an atomized mixture. In case you're not sure, the right side is the main jet passage. And the left side is the secondary jet passage that is controlled by the needle in the slide.
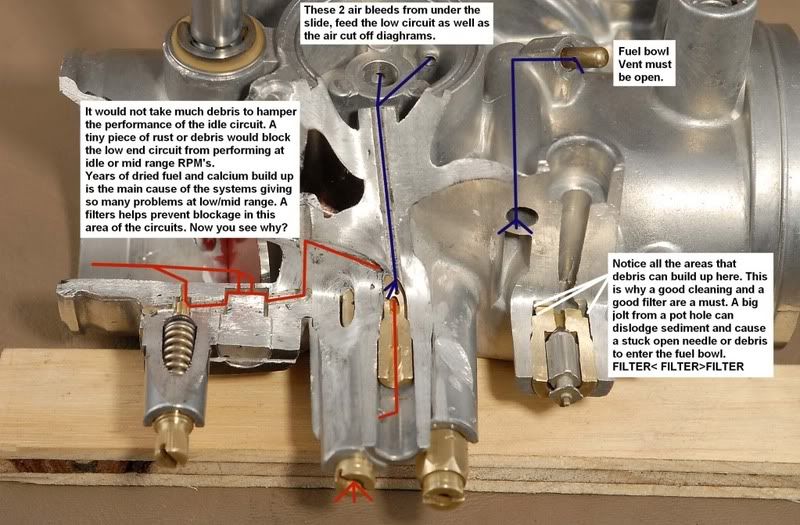
This second picture shows a very intricate picture of the idle circuit and all the related circuits. Each of them must be clear and functioning properly for one another to work. I want you to notice one thing here. Even though it may seem big in this picture, all these passages that are drilled into the body are very small, and are step drilled. This means that as old fuel and calcium deposits build up, the passages, jets and airways get restricted very quickly. ANY restriction in one or another will effect the function of the entire circuit. As you can see, the .018" hole in the low jet would not take very much to plug it up. Also notice the area around the 3 idle holes at the throttle plate and for the idle mixture screw. Lots of places for junk to build up and plug the circuit in this isn't there. Imagine dried up fuel deposits finally getting loosened up and not dissolved or removed all the way. Those strings of gelled fuel and loosened calcium go straight to the only outlet they have. And it's the holes that you need clear for the engine to run below 5000 RPM or at idle. If that tint area at the needle gets plugged, it is why you can't get the idle needle to make a difference when you screw it all the way in. One of these 3 hole's slightly open, is enough to keep it at an idle. But beyond that, it will suffer due to fuel starvation.
One more thing. The air cutoff diaphragm controls the extra air bleed in the center hole. As you let off the throttle all the way, the added vacuum signal from the motor travels up to the top side of the diaphragm through the hole in the cover that holds it in, and pulls it up against the spring. And the brass plunger in the center shuts off that center air bleed. This in turn will cause more fuel to be pulled through the low jet (just like if the other air bleeds were plugged on the other side) and adds extra fuel to the motor at off idle. This is how it keeps the engine from having a lean popping in the exhaust when you let off the throttle after high RPM's. It pulls more gas in due to restricted air flow to the system making the off throttle run rich enough for the fuel in the exhaust pipe not to combust and cause popping.
I'm sure I have missed a few points to which some will have questions to. But I hope this helps you understand the insides of your carbs a little better.
Another article on carbs:
Carburetors
- The name itself comes from the first carbide lamps that used a small hole to drip water on carbide rocks. This produced a gas that was fed through another small hole and was burned. The use of precise holes to deliver a burnable fuel is similar to the motorcycle carburetor, thus the name.
- The motorcycle carburetor is a very touchy device that can cause all kinds of trouble if mishandled or neglected. It is VERY expensive to have a dealer overhaul an old carburetor but is well within the skill level of most garage mechanics.
- Honda used two basic types of carburetors, CV and slide both made by the Keihin company. The CV type, Constant Velocity or Constant Vacuum, uses pressure to raise the throttle slide where a cable is used in the slide model.
- A carburetor is a device that controls both the amount of air and fuel that is allowed into the cylinders. The amount of air is controlled by a butterfly valve (CV) or a vertically moving throttle slide. The amount of fuel is controlled by the drop in pressure in the throat of the carburetor and the size of the holes that allow the fuel in.
- Things you need:
- clean work surface that will not be disturbed
- carb cleaner, one can should do
- clean rags
- oil catch pan
- toothbrush or similar brush
- wood dowel rod and toothpicks
- standard set of tools
- compressed air source
- typical manual such as Clymers, Haynes or Chilton
- Typical carburetor overhaul:
- 1) Turn the tank petcock to off and drain the fuel from the lower bowl of the carburetor. Caution: the bowl screw may be fused to the bowl from neglect so dont force it. The carburetor is made of aluminum and will not take rough treatment very well and will strip, mar or even break if too much force is used. If the fuel has been left in the bowl for a long time it will give off a very strong characteristic odor. Discard the fuel properly. Small amounts of old fuel may be burned, which in itself may take some effort to light it!
- 2) Disconnect the carb from the hard rubber engine sleeve and the air box. Disconnect all cables and fuel lines. If your carburetor is a slide type you may need to return to the slide you just removed at a later time.
- NOTE: If you are just starting out in the wide world of motorcycle repair, it may be wise to attach labeled tape to all things removed for future reference. I didnt for my first carburetor rebuild and really boobed it up! A small notebook will also help out if you make notes.
- NOTE: If your bike has 2 or 4 carbs that are ganged together, do not separate them but leave them in a group.
- 3) Set the carburetor on your work surface with a shop towel underneath. Remove the 4 bowl screws and tap on the bowl with the handle of your screwdriver until it drops off, it may stick. Remove the bowl drain screw and check its washer. Many times this washer is damaged and will need replacing. Clean the bowl.
- 4) Now you get your first look at the damage! If this carb, like so many, has been sitting in the bike for years without use, it will be all gummed up or even corroded! The lighter components of gasoline tend to vaporize off leaving the heavier ones, also known as varnish.5) FLOAT:
- Remove the float pin. If it does not want to come out, you need to heat it up. I use a heat gun but a small torch or even matches will work. Caution: remember that this IS gas and it is flammable! I dont recommend that you beat on the small pin to remove it since the two posts that hold it in place are aluminum and will break! The float will be brass or plastic depending on the age of the bike. If brass, inspect for holes or major kinks in the hollow float and replace if found. The plastic float does not suffer from these problems but may be cracked and need replacing.
- NOTE: carburetor rebuild kits can be purchased from a dealer and will usually have all the parts needed to replace worn or damaged items. Although most of the time I find such a kit is not needed, I would hold off until you know for sure.
- 6) FLOAT VALVE and SEAT:

- The small torpedo shaped piece of metal hanging from the float is the float valve. Clean it up and check if the nipple-like pin in the top (closest to the float) moves in and out freely. If it doesnt, soak it in carb cleaner until it moves freely. This spring driven nipple serves as a shock absorber to hold the valve in place. Check the beveled end of the valve for any grooves from wear. If you can see one clearly you may want to replace it. Later valves have a rubber beveled end and normally are OK.
- The float valve seat is the round brass hole that the float valve sits in. Clean and check it for wear. The seat can be screwed in, fitted with a washer or even pressed in (no removal) so check before removing.
- 7) FUEL JETS:

- The term jet refers to any device, normally brass on motorcycles, that has a small hole. Your carb can have 2, 3 or even 4 jets depending on the model and year. Remove the small brass jet(s). They may be screwed in (they have a hex shape top) or pressed in (round top shown above). The pressed in type normally has a small leaf spring holding it in. Caution: all brass parts can be damaged easily with force! Soak these jets in carb cleaner and make sure the jet is clear. Forcing something hard through the small jet hole can cause damage to the hole. If needed use a soft material like a toothpick. Each jet will be marked with a number, check it against the manual.
- NOTE:check your manual to see if the jets are of the right number
- 8) JET HOLDER:

- Underneath the jets are brass tubes called jet holders. They make sure the jet is in the proper position and allow air to mix with the fuel. Flip over the carb and press on the two holder ends with a wood dowel rod to remove them. Soak these in carb cleaner and make sure all openings are clear.
- 9) PILOT (SLOW) JET:

- There will be one final jet in this area, the pilot or slow jet. This jet controls the fuel while the bike is idling and is normally in the worst condition. It can be found under a rubber plug and has a slotted head that can be screwed out. This baby has to be super clean! Soak it and blow compressed air through it until clear. PROBLEM: the pilot jet wont open up! This happens a lot and can be troublesome. You have two options; 1) buy a new one or 2) buy a carb jet cleaning set (offered in Dennis Kirks Catalog). The cleaning set is actually a set of small wires that can be used to push through the jet carefully. The other thing that can be used is a guitar string, sorry I dont remember which one.
- 10) AIR SCREW:

- On the side of the carb, sometimes the bottom, the air screw can be found. Gently screw the air screw in and note how many turns it takes to gently bottom out. This information may be helpful later.The air screw works with the pilot jet to supply low idle mixture to the engine. Remove it and watch out for a spring, metal washer and rubber washer. Make sure it is clean.
- 11) THROTTLE SLIDE:

- The throttle slide is the main device to determine the amount of fuel the engine receives. If you have a CV carb, remove the 4 screws on the top of the carb and remove the throttle slide. Inspect the rubber diaphragm for tears and clean the slide with carb cleaner. Any tears in the rubber warrants a new slide. Clean and inspect the needle extending from the bottom of the slide. It should show no grooves or nicks. This needle fits into the main jet holder sometimes called the needle jet found in the bottom of the throat of the carb.
- If you have a slide carb, go back to the bike and inspect the throttle slide still hanging from the cable. Clean it and the needle. Place both back in the carb and check to see that the slide moves freely and has no hangups. If it does, clean again with 0000 steel wool. Clean and check the inner wall of the carb also.
- 12) MAIN BODY:
- You now have to clear out all of the fuel and air passeges that tunnel through the main body of the carb. Spray carb cleaner into all holes and passegeways that you can find (place the oil drip pan under the carb to catch the overflow). Now blow compressed air into the same holes to ensure that they are clear. If one does not blow clear it may be a dead end, there are several. If one is clogged there is little to do but soak and blow since most of the channels make right angle turns and pushing through a wire is not possible.
- NOTE: some people will soak the entire main body in a solvent at this time.
- Caution: if you do soak the unit make sure the solvent will not damage the aluminum body.
- 13) FINAL CHECK and ASSEMBLY:
- Clean the outside of the carb body with carb cleaner and a toothbrush. If all passeges are clear, all jets, valves, holders and slide are clean, reassemble the carb.
- Points of interest:
- a) make sure the gasget for the CV slide diaphragm is in its proper groove
- b) the jet holders are pushed fully in and seated
- c) the jets are firmly in place and the pilot jet is screwed in
- d) spring, washer and rubber washer for the air screw are in place
- e) the bowl gasket is in place
- 14) ADJUSTMENTS:
- If you have a brass float, set it to the specs in the manual. Set the air screw to the number of turns also stated in the manual. If the air screw turn value is not available, use the number you noted when taking it out. On the slide carbs there is an idle set screw on the side of the carb. Set it so it just touches the slide.
- Theory of use:
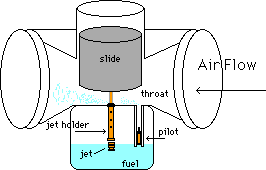
- When the pistons of the engine move downward, they draw in air. This air is pulled through the throat of the carb and causes a drop in pressure. This drop causes the fuel to be drawn upward through the jet like a straw. When at idle, the main jet is closed by the needle hanging from the slide and supplies no fuel. Instead the drop in pressure causes the fuel to be drawn up through the tiny pilot jet. Since the jet is a set diameter it will only allow a set amount of fuel and thus a set idle. The air screw allows air to be mixed with this fuel and can change the idle speed slightly. The final idle adjustment comes from the butterfly valve (CV) or throttle slide position. Adjusting these devices controls how much air passes and thus the position of the throttle slide and main jet opening (because of the needle position). When the throttle is opened, the slide moves up and the main jet opens allowing more fuel to enter the throat. By the way, the pilot jet always supplies its fuel no matter what the main jet is doing. Some bikes have a secondary jet that supplies fuel in an intermediate range between idle and higher throttle settings.
- The float does just that and floats on a bowl of fuel. If too much fuel enters the bowl it starts to push on the float valve that closes off the fuels entrance. When enough fuel is used the float drops enough to allow the valve to open and allow in more fuel.
- Possible problems:
- If too much fuel is entering the engine, the float valve may be set too high allowing fuel to enter the throat of the carb. Another sign of this may be fuel running from the drain tube. Sputtering and misfires may result.
- If not enough fuel is getting to the engine the opposite may be true. Typical symptoms are poor running and no power when throttle is opened. Also check the fuel petcock and make sure there is no obstruction.
- If fuel slowly leaks from the bowl lip, the bowl gasket is probably torn and needs replacing.
- If the bike will not idle, the pilot jet most likely needs cleaning. Also check the number of turns the air screw was turned out, usually about 1 turn out is average.
- If poor engine running presists check the connection of the carb to the rubber sleeve on the engine. This connection must be tight.
- the engine races at a very high speed and will not idle down. This is usually caused by the throttle slide (slide type of carb) being put in improperly.
- pilot jet keeps cloging up time after time. This may result in rust or sediment in the fuel tank. Install an in line fuel filter.
Click here to return 
This site is backed by Number 85, who provide the hosting. If you need a website done, get in touch with them.
