Adjusting the Valves
Is there any subject that gets discussed more? Well, probably carbs and ignition, but we are going to explain the basics of valve adjustment and cam chain adjustment anyhow.
The first step is to make sure the bike is "stone cold". That means it hasn't been started for at least 8 hours. You will get erroneous settings if you decide to ignore this step. Now remove both valve covers. Usually the gaskets will remain on the covers, and can be reused. If they don't stay with the covers, no big deal, we will insure that they are arranged correctly later. Also remove the 17 mm inspection covers under the radiator Cover location picture and under the water pump on the right rear. While we are thinking about it, all directions as to "left" and "right" will be as the rider is sitting on the bike. If you don't have a good 6 point socket set, I would suggest getting one. Many hex head bolts, including the inspection covers and oil filter, can be rounded off with any other type of wrench. (I told you so).
We will start on the left side's valves, for no other reason than we can get the cam chain adjustment done while there too. Using a ratchet, extension, and 17 mm socket, insert the socket in the inspection hole under the radiator. It will mate with a 17 mm bolt that is the end of the crankshaft. Turning this bolt, rotates the engine much easier than the manual's directions to rotate the rear tire. If you haven't removed the sparkplugs, do it now. If you only have a 18 mm deep regular socket, the plug can be retrieved from the recess by using the plug cap. Just gently push the cap onto the plug and remove. With the covers off, you should be able to use your fingers to grab the plug. Removing the plugs allows the engine to rotate much easier, as it isn't overcoming compression.
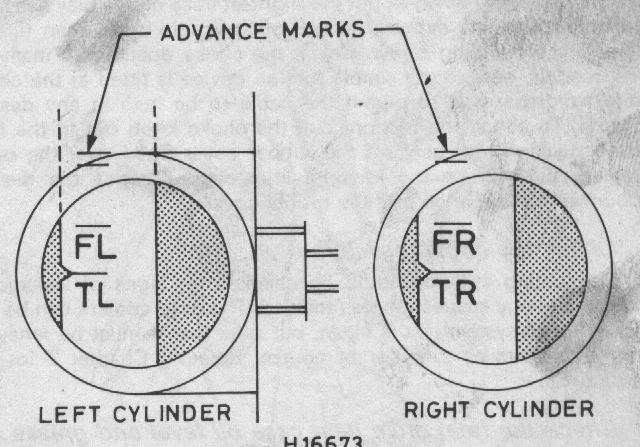
Now start to rotate the engine with the wrench. Turn in a clockwise direction as you are facing the engine, or the same direction as you would tighten the bolt. You don't want to unscrew this bolt. (Highly unlikely, but don't take a chance.) By looking in the rear inspection hole, you will see some letters show up as the flywheel is turned. We are looking for TL aligned with the pointer. TL stands for Top Dead Center - Left. This is when the piston is at the top of it's travel. Now, here is the rub. We need to adjust the valves at TL on the COMPRESSION stroke. The flywheel will bring this mark up twice in the 4 cycles. To insure that you are on the Compression, there are several clues. One is that if you watch the valve train, the intake valves will go down, (open) then close. When the mark appears just after this, you are on compression. Another clue is that the tappets will have some looseness to their action. You should be able to very slightly move the rocker arms. Not much, remember we are talking thousandths of a inch here, but feelable slack unless they were adjusted much too tight previously. The push rods will also be able to be rotated, providing the previous valve adjustment wasn't set too tight. The last clue is that air will escape from the spark plug opening as the piston comes up on the compression stroke. Use all three clues to make sure. Adjusting on the exhaust stroke will not work!!!
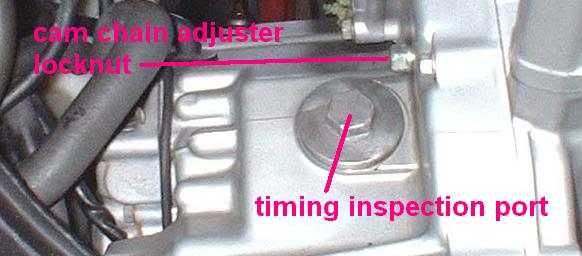
Locate the inspection cover under the radiator at the front of the engine and the other on the right side of the engine.
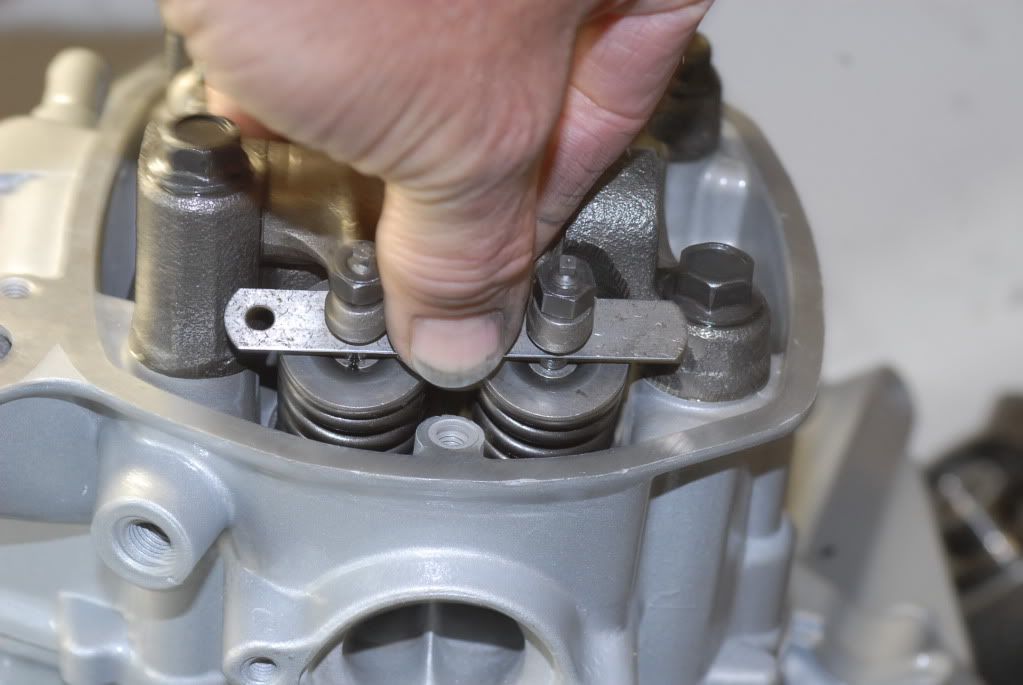
Now we are ready to do the actual adjustment of the left side. The most accurate way is disassemble your feeler gauges and remove the appropriate feelers. This will allow positioning the gauge under both tappets simultaneously. If the gauge can be retracted in a even manner when pulled from the center, both valves are adjusted equally. If not, then loosen the adjusting nut and turn the square headed tappet to change the gap. Tighten the nut moderately and check the gap again. When the gauge can be retracted evenly with a slight to medium drag, this set of valves is properly adjusted. Now go to the other set on the left and repeat. It may take a few tries to get them adjusted, tightening the lock nut changes the setting. Just take your time and do it right.
At this point adjust the left side of the engine starting at the intake. Place the correct feeler gauge under tappets and adjust them. You want to be able to pull the gauge out from the center so it comes out evenly from under both valve adjusters.
Valve clearance:
CX Model - 0.003" for intake, 0.004" exhaust. 1983 models - 0.004" intake, 0.005" exhaust
Now with the timing mark still at TL, loosen the cam chain adjuster bolt no more than 2 turns as this bolt is not designed to come out. If you previously arrived at the TL mark by even slightly rotating the engine backwards with the front bolt, go back and approach the TL mark from the clockwise direction. The reason for this is that by turning the engine even slightly counterclockwise, the cam chain becomes tensioned on the adjuster side. The action of the adjuster cannot overcome this tension and the adjustment will not only be wrong, but likely worse than no adjustment at all. Using a light hammer, or the handle of a screwdriver, lightly tap the end of the adjusting lock bolt to help shock the adjuster into a new position. (It is not necessary to beat on the bolt, just tap slightly harder than cracking a egg.) Tighten up the bolt, (don't overtighten, (The FSM says torque should be 6-9 ft lbs), the engagement threads are short and small on this bolt), and you are finished.
Now go and do the right side's valves. When both sides are adjusted, position the valve covers and their gaskets on the head. Make sure the center gasket is properly aligned or oil will leak out of the cylinder weep hole. Install the valve cover bolt and DO NOT overtighten. They are shoulder type bolts and when you feel the shoulder contact the head, only a slight tightening is needed.
Thanks to Blindstitch for the picture By Blue Fox
This site is backed by Number 85, who provide the hosting. If you need a website done, get in touch with them.
