Starting Motor
Contents
Lethargic starter motor and how to do a ground modification for better starting.
.
.
[Starter Motor Mods x3 - external link]
- -----------------------------------------------------------------------------------------------------------------------------------------------------------------
- The other method of doing a ground modification that Eruovee refers to is to use a fly lead from the brush to the end cap. I find this easier than the solid strap, as measurements are not as critical.
- I first procure a 2" lead of braided copper wire of at least 12 gauge. This can be difficult to find, but I used the outer braid on a coaxial TV lead-in and doubled it over. Another source would be the solder wicking braid that is available at Radio Shack. Just double over and twist until you have the appropriate size. The braided wire is important in order to have flexibility when you are assembling the cap.
- Now use some loop terminals and install them on each end of the 2" braid. If all you have is insulated, just strip off the insulation plastic. You can also open the crimp to get the cable in, as we will solder them in the next step. Crimp the terminals to the extent possible and using a SS hemostat, crimp it on the cable next to the terminal. If you decide to skip this step, the solder will wick up the cable and turn it into a solid wire. If it comes up a bit, that is usually OK.
- Now take the motor's end cap and locate a area on the inside that is free of casting obstructions and when assembled will be on the same side as the brush with the uninsulated lead is on. Now transfer this location to the outside of the cap and drill a hole thru the case. I use a 8-32 screw, so drill appropriate to the size you are using. With just a bit of forethought, you can position this on the top or back side of the motor when it is reinstalled.
- Now remove the screw that holds the uninsulated brush lead and slip it thru one of the braided loops. Replace this screw back into the brush. Slide a screw thru the other loop and while assembling the cap, feed it thru the drilled hole. Make sure the cable isn't rubbing on the armature. Now add a nut to the screw from the outside and spin it down. Tighten to very snug and hacksaw the protruding end off flush. Now take a punch or hammer and flatten the end to prevent backing off. File down if necessary for aesthetics.
- Reinstall the motor and enjoy.
by Blue Fox
- Here is a diagram courtesy of Reg in Bristol on how the diode interacts with the starting system:
Here's the starter system extracted from the wiring diagrams so you can see its pretty straightforward
If the neutral or clutch switches are closed then the circuit to ground from the solenoid coil is complete and the starter should run. All the diode does is prevent the neutral light glowing when the clutch is pulled during riding and doesn't HAVE to be there
HTH
- Somebody grab and stash it cos I often lose track of all my stuff !
So if the diode is faulty then light will come on when clutching?
Ahh ! It depends.... If the diode fails 'short' ( short circuit) it acts like a piece of wire and yes, the neutral light will glow when the clutch is pulled. Both neutral and clutch switches can still be used. But. If it fails by going 'open' (open circuit) then the neutral switch is effectively removed and the solenoid will only work when the clutch switch is pulled. the neutral light will still work so you wont get any visible sign of failure.
A simple continuity or resistance test on a good diode would show continuity one way and not the other as the diode acts like an electrical one way valve.
Most digital meters have a diode test function Using this, you should get nothing one way round and the forward voltage of the diode the other, typically about .6v
Here is a diagram complements of Wolfgang on the starter circuit:

And finally a post from Shep on how to clean the starting motor:
Starter motor servicing
by Admin » Fri Mar 20, 2009 1:16 pm
1:Disconnect Battery both terminals and put on charge and check condition and top up if required(Distilled water/rain water).
2:Disconnect main Heavy Duty Starter motor cable from solenoid.
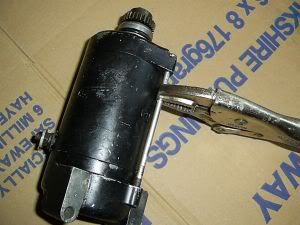
3:Remove the two M6 8 mm Head(Sometimes 10mm head) starter to engine bolts at the rear of the starter motor.
4:Use Large flat blade screwdriver between Starter and engine to prise Starter away from engine and manoeuvre out.
5:Remove cable from Starter motor body remembering that this is an Insulated arrangement and this is a Positive power cable and therefore is isolated from the Starter motor body by the fibre/rubber washers.
Clean the 2 starter motor long locking bolts with a wire brush so there's no corrosion near any of the threads etc Both Ends.Soak liberally with rust penetrating fluid like WD40 or better sill invest in some ACF50 and you may have to apply heat.
See picture below using Vise grips if required and a good Phillips screwdriver to loosen and remove the two bolts.
Once the bolts are out remove the Main inner body but see Warning Later on about Washers
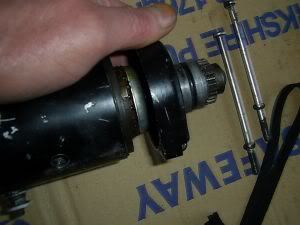
Then remove the small Brush end cover and you should have this,
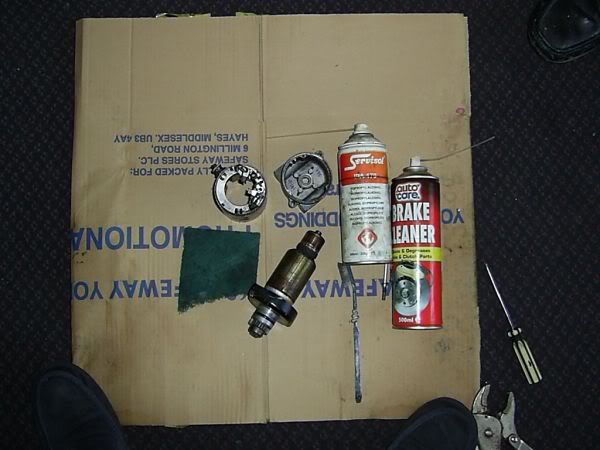
Clean the outer cover and all components with Carb/Brake cleaner and I use Toilet roll as a disposable wipe.I use Scotchbrite to clean the commutator lightly to brighten/refresh and the old toothbrush to then clean all the slits until spotless. You should check the Brushes for wear but they are very robust and most likely not worn enough to need replacing.The commutator is the small brass/copper end of the Starter inner shaft that sits inside the brushes when fitted.
You may have noticed that I have two Aerosol cans I use.The 2nd one is another must have for bikes etc e.g Electrical Switch cleaner. When I've done cleaning with the Carb cleaner I clean again with this as it helps electrically lubricate the electrical parts.
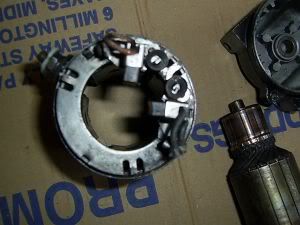
When re-fitting you should place the large inner part of the Starter 1st as you will have to push back the spring loaded brushes to allow the Inner shaft to fit correctly,

Warning!!!! In the above picture and on the end of the shaft there is a Fibre washer and then a steel washer sunken into the shaft-end.You need these as they make sure there's no play in the starter shaft when re-assembled.Make sure you don't lose these and they go back on if it comes off otherwise the Starter inner shaft will move too much inside the body and become faulty by undue wear.
Fit the Large Inner Starter arrangement 1st.When you have the large part in you can fit the end-cap.You must line this up with the Bolt holes for the two long thin bolts to go back in but to not fully tighten until you have also spun Both ends around so that the Stub bolt where the Positive Cable goes will be in a position where the cable will bolt back on easily usually on top of the starter.
You should test the Starter before re-fitting on your Battery to make sure it spins freely.Then you can re-fit but also check the small O-ring oil seal on the engine end of the Starter to make sure it's OK otherwise you may get an oil leak.
This site is backed by Number 85, who provide the hosting. If you need a website done, get in touch with them.
