Fuel Tank
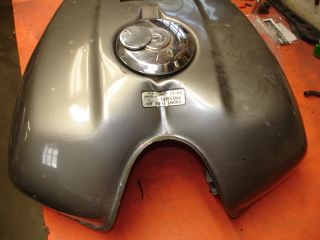
The fuel tanks on our bikes suffer from the same issues as any uncoated steel would in the presence of moisture. They RUST, if not maintained. And it is not unusual for these bikes to set for 20 plus years in a barn, shed, or outdoors before being restored. The tanks I have encountered ranged from light surface rust stain, to gummy, rusty, nasty, residue left from a half full tank being left for 20 years. And when cleaned, some of these had rust thru leaks in the lower seams and even along the lower curve of the tank. I managed to restore all of these, but sometimes they are just too far gone to restore.
After removing the tank from the bike, you will need to determine the condition of the tank. Start by removing the filler cover. Even if you don't have the correct key, most of the tank locks are simple enough to turn and release with a nail file, thin knife blade or your lock picking tools. I like to completely remove the cover if possible. Then remove the petcock which we we discuss later. Inside the petcock hole there should be a O ring and a fuel strainer. The strainer is a plastic cylinder about 3" long that is perforated and covered with a fine mesh screen. This provides a pre-filter for the carbs. It can be a challenge to remove this filter. The easiest way I have found is to use a Easy Out and insert it lightly with your fingers. Wiggle and pull when it gets a grasp on the filter. Don't try tightening too much as this will just expand the plastic and make it tighter. With a little patience, they can usually be removed intact. Now is also the time to determine if you are going to repaint the tank. If there are dents, possible leaks, bad scratches, or other issues, you don't have to exercise the same care in the internal cleaning as if the exterior was pristine.
Now examine the inside with a flashlight and dental mirror. Lets assume that your tank is covered with rust, and muck inside. My next step would be to power wash the interior thoroughly. I have a home professional power washer, but the car wash ones are perfect too. Insert the wand to the extent possible inside the tank and blast at different angles. When it appears that no more crud is exiting the filler or petcock hole, it is time to go to the next step.
The next step would be to introduce into the tank some material that when the tank is shaken or rotated will abrade the rust spots on the inside. The best I have found is a old chainsaw chain. It has sharp edges, easy to get back out, and works well. I have also used large nuts, sharp rocks, and anything else I could find I thought would work. Smooth, round objects wouldn't be as effective to bite off chunks of rust tho. I use these in conjunction with a rust remover such as phosphoric acid, metal conditioner, kerosene, and a few other items I had on the shelf. Shake the tank with the petcock and filler hole sealed with duct tape for as long as you can stand to do it. 10-15 minutes the first time may work. Then dump the parts out and do the power wash again. Keep doing this until there is no more rust coming out when you rinse.
Now is the time to do leak repair if you have to. Examine the lower edges and sides of the tank for brown or bubbled areas. When you find one, try to press on the area with a small screwdriver. Press hard enough that if the area is weakened by rust from the inside, the screwdriver will punch thru. I know this sounds like you are making yourself work, but if you don't find these spots now, you will find them after you have spent hours preping and painting the tank. If you find even one, I would recommend taking a sander and removing the paint in this area and all adjacent areas. This will likely expose more areas. Try to find them all and mark with a sharpie.
After marking the areas, use a ball peen hammer to indent the weak area and a small area surrounding it. Note that all paint needs to be removed before you do this. Down to shinny metal. After you have made a approximate 1/8" deep dimple over the hole, apply soldering flux and using a mini torch heat the tank until the solder flows to fill the dimple flush. If your damaged area is too large to bridge with solder, thy using a small bit of copper screening to provide a bridge for the solder to adhere to. It doesn't have to be perfect, but you do want a solder area extending a half inch or so from the hole. When all the areas are done, use a sanding block to sand down any solder humps that may remain. Then apply a layer of Bondo or glazing putty over the area and re-sand. Then prime, but don't paint until you have completely finished with any interior coatings you may want to apply on the tank's inside.
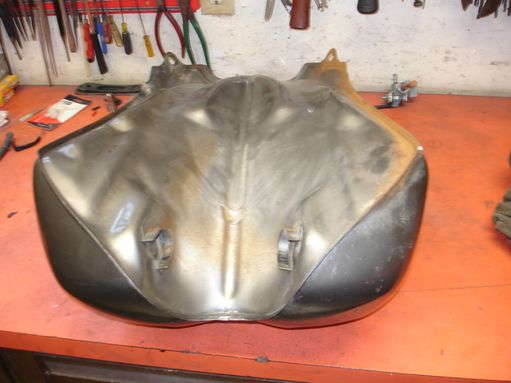
There are several ways to remove dents from tanks. I have tried a few, and some worked better than others. The safest is to pad a curved bar and try to tap out from thru the filler hole. Not all areas are accessible from there, but a lot are. Then you can use a slide hammer and sheet metal screw to pierce the dent and try to pull it out. Not very effective. If you were doing many dents, then a stud gun that welds studs on the dent and a puller can then grasp these and pull the dent out. Commonly used, and seem to work fine. You just have to sand down the studs for glazing and painting. I once had a hot glue system that I picked up. The idea was to hot glue tabs on the dent and then using the system, back some screws off and pull the dent out. This disappeared with one of my teenage sons before I could try it. I have also heard of filling the tank with water and then freezing the tank. The expansion of the water turning to ice is supposed to push the dents out. Never tried that one, but I would think that the seams would also be pulled open. The last and most embarrassing method I tried was to pressurize the tank and let the internal air pressure pop out the dents. This is what happened when I tried that:

 Just a quick note, I pulled this tank back to original condition using ratchet straps and hydraulic jacks. Along with some choice words.
If the tank was severely rusted, and especially if rusted thru, you will probably want to line the interior with a coating. I have used POR 15, and believe that is superior to Redcoat, and Kreem. I have removed what I think was a coating of Kreem from one tank I received that was peeling, and it is almost impossible, and expensive to remove all vestiges of the old coating. I have not have not had any issues with the POR 15. The most important thing on all of these coatings is to follow the instructions to the letter. Do not create your own short cuts or better drying schedules or you will be disappointed in the final result.
by Blue Fox
This site is backed by Number 85, who provide the hosting. If you need a website done, get in touch with them.
