New Bike Checklist
MotoFaction's CX and GL new bike checklist
Contents
- 1 Now that you have your new bike home, we need to check things out before riding. - Blue Fox
- 1.1 The first order of business to to get a service manual. There are three main ones that are available. The factory service manual (FSM) can be downloaded from this Wiki site or the Quick Reference section of the forum Factory Service Manual. The other manuals are Haynes, and Chilton. The Haynes is written with a British flare, the Chilton is American. Both contain a few errors, so if something doesn't seem right in them, do some more checking.
- 1.2 Safety first
- 1.3 Brakes
- 1.4 Tires
- 1.5 Rear drive spline service
- 1.6 Steering
- 1.7 Fuel system
- 1.8 Oil and coolant
- 1.9 Let's fire it up!!!
- 1.10 1. Source
Now that you have your new bike home, we need to check things out before riding. - Blue Fox
The first order of business to to get a service manual. There are three main ones that are available. The factory service manual (FSM) can be downloaded from this Wiki site or the Quick Reference section of the forum Factory Service Manual. The other manuals are Haynes, and Chilton. The Haynes is written with a British flare, the Chilton is American. Both contain a few errors, so if something doesn't seem right in them, do some more checking.
I would suggest at least leafing through whichever manual you get. You don't have to study the thing for days, but at least page thru and look at the pictures to familiarize yourself with some of the systems, parts, adjustments, and maintenance procedures. I know that most guys already know everything about everything, but from the forum activity the last few years, a few may have forgot a couple of items. And everyone wants to ride right now!
Safety first
The first order of business is making sure the bike is safe to be on the street. If it isn't safe, it doesn't matter that it purrs like a tiger kitten. So, let's start with the tires. Put the bike on the center stand for ease of checking and safety when do so. On the center stand, the rear tire will be clear of the floor. To raise the front tire, you will need to have someone push down on the rear fender and block up the engine.
First, check the manufacture date on the side of the tire, here is an example of one that was made the 51st week of 2007.
- Tires Manufactured Since 2000
Since 2000, the week and year the tire was produced has been provided by the last four digits of the Tire Identification Number with the 2 digits being used to identify the week immediately preceding the 2 digits used to identify the year. Example of a tire manufactured since 2000 with the current Tire Identification Number format:
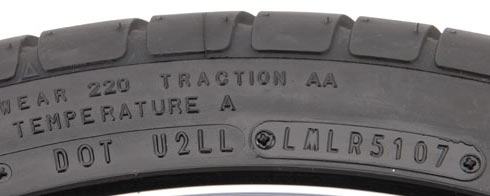
If your tires are over 4 years old, it would be prudent to consider mounting new tires, irregardless of the amount of thread left. Older rubber gets hard and the sidewall can become stiff. New tires will improve safety, handling, and peace of mind.
Brakes
The next item will be the brakes. It doesn't matter how fast you can go, if you can't stop, you are in serious trouble. The front wheel supplies about 80% of the stopping power for the bike, so it is essential that they work properly. Try spinning the front tire. If it easily spins, and you don't feel any roughness from bad wheel bearings, the brakes may only have to be inspected for pad wear and the fluid renewed. You should be able to view the pad thickness through a sight slot on the caliper. If there appears to be at least a 1/8" thickness left on both pads, you may be OK, at least for now. The brake fluid should also be replace before putting the bike into service. Remove the cap on the master cylinder, and open up a new container of DOT 3 or 4 brake fluid. Install a clear hose on the bleeder valve on the caliper (you saw what that was when you paged thru the manual, didn't you?). Now immerse the open end of the hose under a inch or so of clean fluid in a small container. Open the bleeder valve while gently squeezing the brake lever. You will see fluid (probably dark colored) being forced thru the tube and into your container. Once you have the bubble out of the clear hose, you can continue just squeezing the lever until the fluid runs clear. Don't forget to keep adding fluid to the MC. If you let it run dry, air will enter the system and you will have to do a brake bleeding. Close the bleeder valve when done and discard the old fluid in the container. Now spin the front wheel and check that the brake lever will stop the wheel and that the lever feels hard, and not spongy when pulled.
The rear brake is a simple expanding shoe that works off a cam system in the hub. If it appears to stop the bike and all linkages are smooth, you can wait until you remove the rear wheel to service them.
Tires
While the bike is up, now would be a good time to check you tire's air pressure. There are divided opinions on the pressure to be used in these bikes. Some say the new style tires require a higher pressure than the OEM ones. My recommendation is to use Honda's published pressures from the manual or the tag on the bike. Run at the upper level of these if you prefer, but never exceed the manufacturer's maximum pressure stated on the sidewall. Tire choices FAQ TIRES Wheels and Tires
Rear drive spline service
Be sure to check the rear drive splines Rear Wheel Spline Service You don't have a chain to maintain, but there are splines in the rear hub that require maintenance.
Steering
A last check while the front wheel is elevated is to gently turn the handlebars from side to side. Action should be smooth with no notch in the center position. You should be able to tap the bars and they will go to the stop, then rebound slightly. If a notch is felt, the stem bearings will need to be serviced or replaced. The bike can be ridden, but very carefully, as steering will be wonky, (Technical term, not in manual) or jerky.
Fuel system
Let's go to the fuel system. While some may not recognize the safety considerations of the fuel system, trust me when the petcock is leaking gas all over your leg and the spark plug wires are snapping from a short or leak, you will appreciate having checked it. The first order is to frame that note that came with the bike as to the PO's brother-in-law draining the tank and carbs 16 years ago before the bike was stored. I have such a note, and the only truth being that the bike has sat for 16 years.
So, remove the fuel line from the petcock and turn to on, with a catch bowl below the petcock. Nice clear, clean fuel flowing? Great, now try reserve. Still clean and doesn't smell like rotten gas? You may have dodged a big bullet. Cleaning, recoating the tank and then a deep clean of the carbs is usually SOP for a bike that has set for any length of time. The carbs probably could still be improved by a good, deep cleaning, but let's move on. Make sure the petcock isn't leaking from around the selector lever or mounting nut, and add a in-line filter to your fuel line. If your bike is equipped with the vacuum actuated petcock you shouldn’t get any fuel flow with the valve turned on until there is vacuum applied.
OK, just a couple of more checks to go. Turn on the ignition key and see what lights up. You should have a oil and neutral (if it is in neutral), two front running lights, the headlight, and the tail light on. All working? Try the turn signals? Good there too? How about the brake lights with first the foot lever and the hand lever. And the horn. Try the high beam on the headlight and its indicator on the dash. Everything good to go? The bike is probably safe for a short test ride, after you have the proper attire, insurance, and license.
Oil and coolant
The last thing is to check the oil in the crankcase. With the bike sitting level on the center stand, unscrew the dipstick, wipe off any oil, insert, but do not screw in. Withdraw and see where the oil level is. If it is between the crosshatches and looks relatively clean, I would risk a starting before I drained the old oil. Reason being that if the oil is warm, it will carry more contaminants with it to the drain bucket. If you are not sure, then change it cold. Also check the level in the rear drive and the coolant level in the radiator and the expansion bottle. You will want to change both the drive oil and the coolant soon, but it should be OK for a test run with the old fluids.
Let's fire it up!!!
Let's try a starting!! Petcock on, fresh battery in, enough fuel for the test, and fingers crossed. Turn on the key, (you do have a spare? if not get one made.) pull the choke full out and push the starter button. The engine should turn over (rotate internally). It probably won't start immediately, not to worry. Check for oil pressure by observing if the oil light goes out after a few seconds of cranking. It should. Let the bike set for a couple of minutes and try again. Limit your cranking to about 5 seconds at a time to let the starting motor cool. If it doesn't try to start after about 3 times, shoot a 1 second blast of starting fluid into the mouth of the air box. That should be plenty for the bike to run on for a couple of seconds. Still no action? Now would be a good time to turn the kill switch back on that your buddy standing there smirking turned off.
There she goes, be careful on the first couple of rides. Make them short and uphill if possible. Why uphill? Would you rather push up hill to get home or be able to coast down hill?
You still need to go over all fasteners, replace some fluids, and get accustomed to the bike. But hearing it run gives the encouragement to start the full process of restoring.
Here are some excerpts from Shep's website on new to you bikes:
1. Source
Here is another link from Shep:
Links There is a very comprehensive guide for buyers that is not bike model specific Here.
This site is backed by Number 85, who provide the hosting. If you need a website done, get in touch with them.
